Skid Car Hydaulic System
Accumalator only Frame Hydraulic bleeding
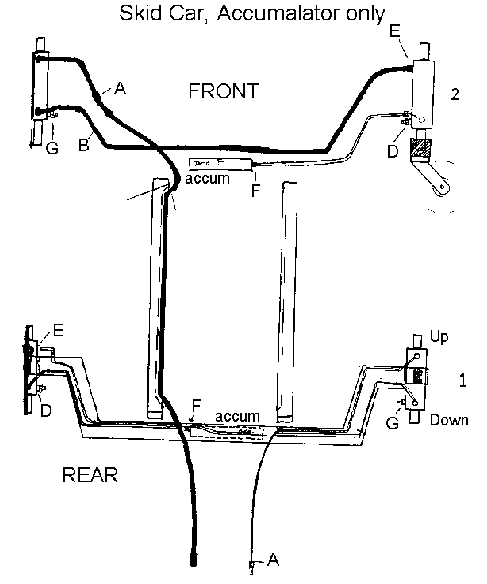
FRONT SKID CAR FRAME BLEED ONLY
Step 1: Fill the hand pump with the DTE 24 hydraulic oil. Ensure the pressure knob is tight.
(This is the knob that would lower a car on a normal jack)
Step 2: Connect the jack to connection G on the left front RAM. Begin pumping oil into
connection G. Note:  If the line is empty with oil, then pump the entire hand pump of oil
into connection G.  Stop pumping as soon as the oil in the sight glass is not visible.
Step 3: Remove the hand pump and refill. Repeat Step2. Watch for movement of any of the
front rams.  The front right ram should begin to move downward.  As soon as this happens
it is time to remove some of the air in the line.
Step 4: Use the 19mm spanner and connect it to the hexagonal nut on E of the front right ram.
Cover the whole nut with rags and place rags or newspaper on the ground below the nut.
This is a precaution as oil is about to be released.
Step 5: Quickly undo the nut on E about 1/3 of a turn for about 1/2 a second then tighten
the nut again.  The oil released will have a large concentrate of air bubbles.
Step 6: Ensure that the hand pump is removed from connection G. Use the system main pump
to raise the front of the skid car.  Press the red emergency lower button (or the down
button on the aux slave box) to close the rams or lower the car.
Step 7: Repeat Step 6 again.  If too much oil is in the line then the right front ram
will not be closed when the car has lowered.
Step 8: If the right front ram is not closed move to step 10, otherwise go to step 9a.
Step 9a: If the right ram is closed, use the system main pump to raise the front of the
skid car to full height (ensure that the pump is not running on continuously. Lower the
height setting if this is the case)
Step 9b: Visually check the height difference between the left and right rams on the front
of the skid car.  If one side is lower that the other, reconnect the hand pump to connection
G.  This may be difficult with the frame at full height due to the oil pressure.  Lower
the skid car by pressing the emergency lower button on the control panel. Connect the hand
pump now and leave connected while the skid car is raised again to full height.
Step 9c: Continue to pump oil into connection G until the rams become even. Lower the frame
again. Use the 19mm spanner and connect it to the hexagonal nut on E of the front right ram.
Cover the whole nut with rags.  Quickly undo the nut on E about 1/3 of a turn for about
1/2 a second then tighten the nut again.
Step 9d: Raise the Skid car to full height. Check the difference between the two front rams.
If required,  pump oil into connection G until the rams become even. Once the rams are even,
lower the vehicle.  Remove the hand pump from connection G.  Ensure that the 19mm nut at
E is tight.  Cycle the skid car to full height then lower it.  Raise the skid car to full
height and check that the rams are even.
Step 9e: If the right ram is not as high as the left ram at full height, pump a little more
oil into connection G until the rams are even. If the rams are even, at full height,
then  lower the frame.  If the right front ram does not close, go to step 10 otherwise we
can stop as the bleeding procedure is complete.
Step 10: Only perform this step if instructed by step 8, Step 9e or Step 11. Ensure that the
frame is lowered.  Use the 19mm spanner and connect it to the hexagonal nut on E of the front
right ram.  Cover the whole nut with rags.  Quickly undo the nut on E about 1/3 of a turn for about 1/2 a second then tighten the nut again.  Go to step 11.
Step 11: Raise the frame to about half way then lower it again. If the right front ram is
closed, then perform Steps 9d and 9e.  If the right front ram is still not closed,
repeat step 10 otherwise we can stop as the bleeding procedure is complete.